What Loom to Choose?
One of the more common questions among beginning tablet weavers is what loom to purchase or build. Starting a new hobby with a $80+ investment can be a bit intimidating, especially if you just want to try it out.
There’s a video exploration of looms in this link, and a written one from a bit earlier down below.
Here are the looms I use in my preference order, along with notes about each.
Peg Oseberg Loom

This is the simplest loom I use, and my favorite. Its 2 vertical pegs, each a 6″ piece of a 1″ dowel, pushed into a board. I have several board lengths from 24″ to 48″. They’re incredibly portable and durable. Using these is very close to the Oseberg-style vertical looms used throughout most of the SCA time period.
Using these does mean measuring your warp on a different surface. I usually use chair legs on the table.
I hook a drawstring pouch over one peg to hold shuttles and thread when traveling or storing my loom.
These are wonderful for brocade or missed hole techniques because the cards rest on the surface of the loom and don’t twist around.
There is no easily adjustable tension. For small changes I’ve twisted the warp around the peg a bit, or tucked something under the end of the threads to add a bit of tension to them.
Josefina Alfdis Nelson commented that she uses one like this too, with a great suggestion! “But I tie a slip knot in the warp and tie it to the pegs with lucet cord. This lets me adjust the tension by tightening or loosening the cord rather than the whole warp.”
Inkle Loom

The inkle loom was my first purchased loom, and its still a wonderful workhorse. The style is entirely modern and there’s nothing quite like it used in SCA time period. However, it is portable, very beginner friendly, and adaptable.
Warps can be measured directly onto the loom without a separate warping board.
A pouch looped onto the first upright can hold shuttles or threads.
Adjustable tension – enough said!
Circular warps or speed warps make setting up the loom fast.
The cards hang on the threads without a supporting surface, this can make them prone to unintended twisting or movement in lower tension setups.
The space between the front peg and the top peg on the front arm is your working area. Depending on the size of the loom and your pattern, this can make dealing with twist frustrating as it will have to be pushed back over that peg.
Box loom
There is some evidence of box looms like these being used late in the SCA period. They’re also very portable and have a lot of easy tension adjustment. However, they can be more of a challenge to set up. (The um, unique, weaving here is courtesy of a very eager 4 year old.)
Warps must be measured separately before being put on the loom. There is an album on my Facebook page (Libby Cripps) on how to warp up and begin weaving on this type of loom.
There is no where for tension to go, patterns must be reversed or twist neutral to weave.
It’s important to keep the warp neatly stacked up when rolling it onto the loom. Uneven warps can cause tension issues later in the weaving project.
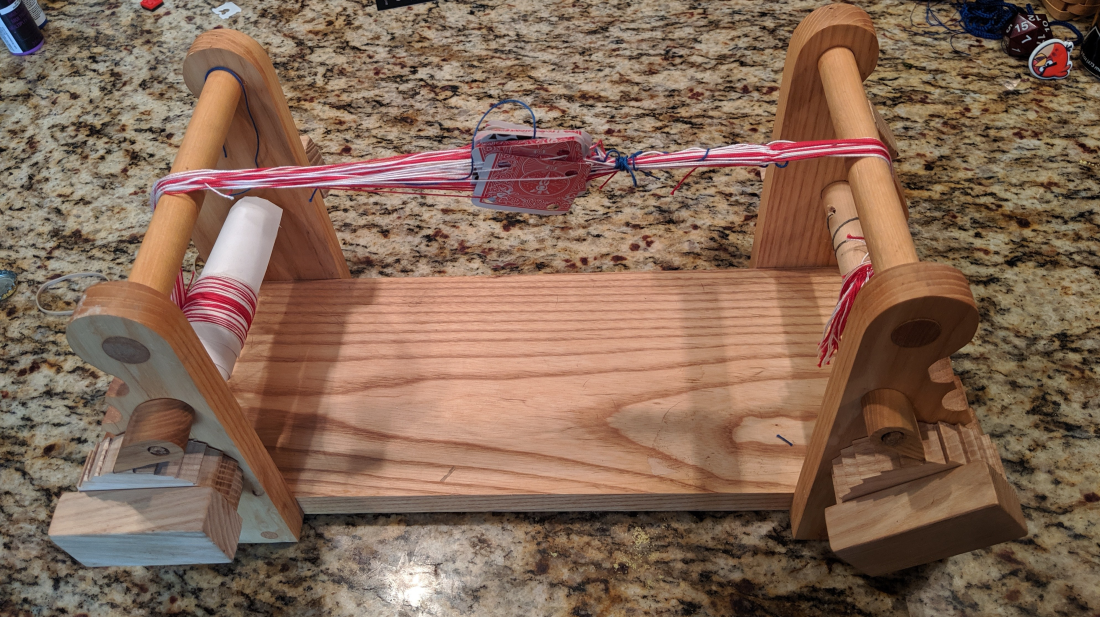
Oseberg style loom

Oseberg style loom. This type of loom is 2 upright poles with some kind of spreading base and feet holding them up. Some illuminations show a center horizontal shelf as well. The name comes from a Viking ship find that contained one of these looms, while the style continued to be shown in illuminations all the way into the 16th century.
Warps do need to be measured separately before being set up.
The larger size takes up more work space and is less portable.
Most of these today are designed to disassemble easily for transport.
The weight of the cards has a lot to do with the tension on this type of loom. Loose tension can also make cards want to slip out of order and flip around to the outer side of the pack.
Loose uprights can also cause changing tension as one is weaving.
The weaver works from the side of the loom instead of the front, this is different than most modern setups and can be disorienting.
Board loom

These type of board looms were one of the first I was introduced to. They’re fairly simple to make – a 48″ board has several end pieces trimmed off of it, then stacked up and drilled through. Carriage bolts are used to secure them. The warp is threaded back and forth through the boards to hold tension.
Like the peg and Oserberg-style loom, these can hold warps of any length. Excess can be rolled onto bobbins or chained crochet style.
Cards do rest on the board surface, making this easier to use for brocade or missed hole technique.
Advancing the warp or adjusting the tension requires mostly disassembling the loom and redoing the setup. This can be time consuming.
Keeping even tension can be challenging.
Other Options

Warp Weighted: One of the oldest styles of weaving is using weights, generally of clay or stone, to keep downward tension on a warp that has been attached to a fixed surface at the top. This technique can accommodate any length, and does not require complex equipment. I don’t have photos or use a loom like this as I have small children and dogs. Dangling weights would be the coolest toy of 2019!
Courtesy of Ann Karen Gronbeck-Peterson, this is one style of warp weighted loom shown in later period illuminations. She gave the following woodworking instructions:
This is about 4 feet tall, with the sides & bottom made of 1 X 4 lumber. It is about a foot wide, a couple of inches narrower than my shuttle, so that the shuttle can be parked in place when I’m not weaving. There is a piece of bark-on Silver Maple about 2 inches in diameter at both the top & about 6 inches up from the bottom. The top piece of Maple is fastened in place a couple of inches from the top; with 2 nails in each end of the Maple, through the side boards so that it is stable. The bottom piece of Maple is cut about 1/8″ shorter than the top one, & has only one nail through the board into each end; and to allow for winding on of finished weaving, a hole is drilled through one side of the board frame & into several spots of the end of the Maple for a pin to hold it from unwinding. I use a wooden clamp to attach the bottom board of the Loom to a 3-legged table which I made.

Backstrap: This is another no equipment needed way to try out tablet weaving. Attach one end of the warp to your belt, and the other to a fixed surface. (I used a stationary bicycle my first time!) By leaning forward or backward you adjust the tension on the warp. There are backstrap kits that add use bars to tie the warp onto with hooks to go over your belt.